If you have never used an inversion table before, the process may seem a little daunting and it may also appear like an unsafe activity.
However, many who have used an inversion table previously will assure you that it really isn’t something to worry about or overthink.
Obviously if you have used an inversion table in the past, this page isn’t going to benefit you very much. In fact it probably wont benefit you at all.
Newcomers however, should hopefully find some reassurance from this page and see that inversion isn’t quite as complicated as may look at first.
Delivery and Assembly
When your inversion table is delivered it will come disassembled, you therefore need to assemble it.
 For some this can be the biggest challenge they face on their road to using an inversion table!
Depending on what inversion table you purchase the assembly could take anywhere between 10 minutes up to a couple of hours (if the assembly instructions are terrible).
Teeter for example, state that their inversion tables can be assembled in around 13 minutes by following 5 easy steps.
Since Teeter inversion tables arrive with some parts already assembled, the buyer simply has to attach the main components of the table together and add the side handles.
This makes Teeter inversion tables a very quick and painless table to assemble. You can even download a free Teeter assembly app to provide even more assistance.
Other inversion tables may not be quite as straightforward and this is often exposed in the buyer reviews for inversion tables.
If you are not very handy and are worried about assembly, it is certainly worth reading the buyer reviews for the inversion table you are considering.
Many reviews will state how long the table took to assemble and let you know whether the assembly instructions are great or complete garbage.
You may also wish to have someone on hand to help with assembly. Some inversion tables are quite bulky and two heads/pairs of hands can often be quicker and more efficient than one.
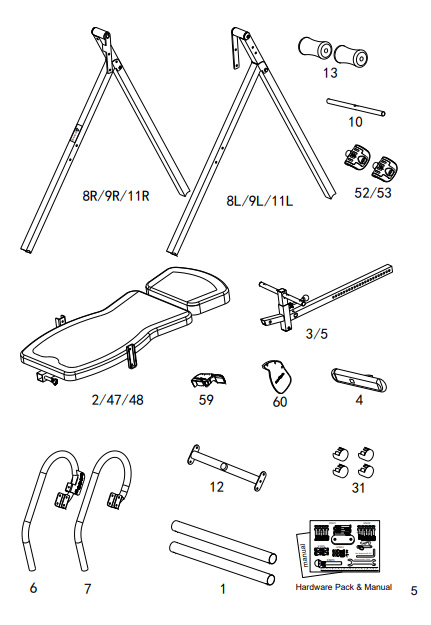
 As an idea of what to expect with regards assembly instructions, here is a pdf of the owners manual for the Innova ITX9600 inversion table.
As you can see the assembly instructions for this model are pretty comprehensive and quite straightforward.
They are also well illustrated making them easier to follow.
Some of the buyer reviews for the ITX9600 also highlight that the table is fairly easy to assemble.
Generally speaking, most good quality inversion tables should not cause too much of a headache when it comes to assembly.
Often if the reviews and ratings are good, you can usually expect the table assembly to be quite straightforward.
On the contrary, if an inversion table has terrible buyer ratings and the reviews state that the assembly instructions are in Chinese or it took an age to assemble due to poor instructions. It’s probably a good idea to avoid that particular table.
Getting Started
Before setting foot onto the inversion table it is a good idea to have a quick read of the user manual.
This will usually cover how to use the inversion table correctly and give you a quick run through of what all the parts and features are there for.
You may also find there is a DVD included which will often show you how to use the inversion table and what exercises and stretches are possible.
There are also numerous Youtube videos on using inversion tables that you can also watch.
You may also be interested in looking at our guide to inversion table features here, so you know what features to expect from most inversion tables.
Setting the Inversion table to match your height
 Setting the height of an inversion table is often something queried in FAQ’s, however it is a very simple process.
As you can see in the image to the right, the available heights are listed on a scale just below the bed area of the inversion table.
As you can also see in the image each height has a corresponding hole on the side of the bar/rod.
To move the height of the table up or down you simply pull the height adjustment knob on the side of the bar and slide the height adjustment tube to match your required height.
Once the height markings correspond with your height, you can release the spring pin adjustment knob making sure it locks securely into place through one of the holes on the side of the bar.
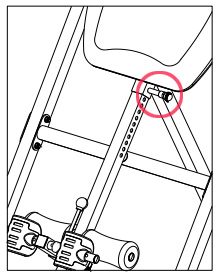 The illustration to the bottom right shows the height adjustment knob in better detail, since you cannot see it in the image above.
So why is setting the correct height important?
Setting your inversion table to an incorrect height will not cause any real problems or make it too unsafe to use.
However it will affect the balance of the table.
If you set the height too high for your body type, you will find it a lot harder to invert.
If set it too high you will not be able to invert at all without a great deal of effort!
If the table is set too short in relation to your actual height you will invert far quicker than is recommended.
This can be quite uncontrollable and unnerving, especially if you are just starting out.
Generally speaking, providing the height scale on your inversion table is set to a height within an inch (or so) of your actual height, you should have no issues with balance or inverting in a steady and controlled motion.
If you do invert too quickly or find it quite hard to invert (or even get into a horizontal position) check what height the table is set at as this is likely to be the cause.
Limiting the Inversion Angle
The next thing to do before stepping foot onto the inversion table is ensure that the inversion angle is limited.
This is, of course, providing you do want to gradually ease into full inversion.
If you want to take the plunge and attempt to fully invert on your first go, no problem, but do remain cautious. You will also need to make sure the angle limitation device is not in effect.
For those of you who want to build up to full inversion, you will have one of 3 inversion limitation devices.
Either a tether strap, a spring pin system/iControl brake or an adjustable metal bar at the back of the table frame. You can read more about each of these systems here.
It is likely to show you how to adjust each of these systems in the user guide you get with the inversion table. And each of these systems are fairly straightforward to adjust.
Tether Strap
 The tether strap works in a similar manner to the seat belts found on kids car seats and the adjustable straps found on backpacks.
You simply pull the tether strap through the plastic grip(s) to lengthen or shorten it to your preference.
The shorter the strap is set the less you invert and vice versa.
You also need to make sure the hooks are attached to both the rotating area of the table and the frame.
You can see the tether strap in use on the picture to the right (the strap dangling down from the lower/mid part of the table).
When you have adjusted to tether strap it is always a good idea to lift the inversion table manually by hand before you get on it. This allows you to see how far the table will invert and adjust it accordingly before using the table for inversion.
Angle selector pin systems

The slot pin system on the Innova ITX9600
These systems are very easy to use.
On a spring pin or bolt system you simply remove the pin for full inversion or place it into one of the limitation angle holes to restrict the angle.
As you can see in the image the angles are all clearly marked. 15 degrees provides a very slight inversion and 85 degrees is very near full inversion, with a number of intermediate angles in between.
Note: On the Innova inversion table (pictured) it has a 90 degree pin setting on the top of the selector for full inversion. This is also handy for keeping the pin in an easy to find location when it is not limiting the angle.
Other inversion table models may feature a different angle scale for eg. 20, 40, 60 and 80 degree increments.
The iControl disk brake system can also be found on some models such as the Exerpeutic 975 SL.
The iControl system is basically a lever that can be pulled while you are inverting to lock the table in place wherever you wish.
This makes it a very useful and easy to use angle limitation system to use, that is not as ridged as the slot pin selector method.
Getting onto the inversion table
Before stepping foot onto an inversion table it is always a good idea to double check everything is assembled correctly and fixed securely in position.
This includes double checking that the height rod is firmly in place, with the pin securely in the selector hole closest to your height.
Also double check the inversion limitation device is attached/in effect by lifting the feet extension and checking how far back the table will invert when you are on it.
 Once the checks are complete you can start by straddling the lower footrest bar on the inversion table.
The ankle holders/foam rollers are opened up using either a spring pin device or an extra long ratchet lever, depending on what feature your inversion table has.
In the top image to the right you can see this particular inversion table features dual foam roller ankle supports and an extra long ratchet lever.
Using this example you would use the lever to widen the gap between the ankle holders allowing you room to step onto the horizontal footrest below the foam rollers.
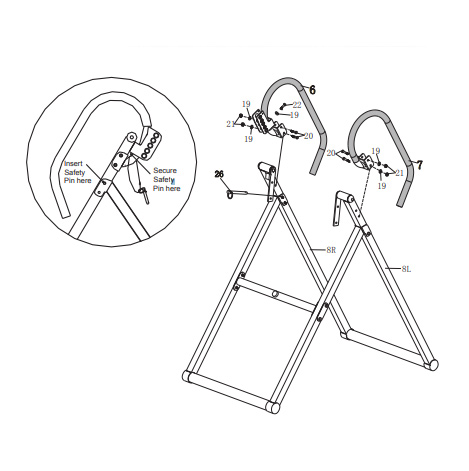
If you do not have an extra long lever lock you will likely have a spring pin system to secure your ankles (Shown in the bottom picture).
The spring pin operates in the exact manner as the height adjustment pin.
 You simply pull the pin out, allowing the front foam rollers/plastic u shape holders to adjust back and forth as illustrated in the lower image.
You can then slide your feet between the ankle holders and then move the front ankle support section to meet the front part of your leg.
Once the ankle supports are securely around your legs you can lower the spring pin into the nearest selector hole to lock the ankle supports in place.
In a similar manner, if you have a ratchet lever on your inversion table, simply pull the lever back to close the ankle supports together and lock your ankles in place.
How to Invert
Provided your inversion table has been set to the correct height for your body, inverting should be an effortless process.
 Simply raising one of your arms should be enough to make the inversion table start to slowly tilt back. On raising both arms you should start to invert.
On your first few inversions remember to also make use of the side handles to ensure you do not invert too quickly.
You should also consider setting the inversion angle to quite a low setting on your first few goes.
Note: If you find on raising your arms you invert very quickly and uncontrollably, try adjusting the height to a slightly higher setting.
Inverting too quickly is often because the height setting is too short for your body. For example, if the table is set at 5 ft 10″ and you are inverting too quickly try it on the next setting of 5 ft 11″ and it should be more balanced.
On the contrary, if you are having to put a lot of effort in to invert, the height setting is set too high and will need to be adjusted down slightly.
Some may prefer to use the side handles rather than raising their arms to invert.
Personally, I find using the side handles a much more controlled way of getting into the horizontal position and inverting.
It is also advisable that once you are in the horizontal position, you should use the side handles to gently rock yourself back and forth for a couple minutes before inverting.
This helps the blood to flow to the upper regions of the body more steadily and will lessen/prevent sudden rushes of blood to the head and uncomfortable feelings of pressure in the head.
It is also worth doing this again after you invert in my experience.
To return to the upright position you can either slowly lower your arms to the side of your body, or use the side handles.
As previously mentioned using the side handles may be more preferable to some as it is more controlled.
It is also advised not to return to the upright position too quickly as this can cause dizziness.